Related topics
This document outlines the instructions for setting up the WMS integration in DC1, allowing the exchange of data to/from an external Warehouse Management System (e.g., Iptor WM1). Iptor Integrator is used as the integration hub in the exchange of data to/from Iptor WM1. For information regarding installation and set-up, see DC1 WMS Integration service setup (Technical reference).
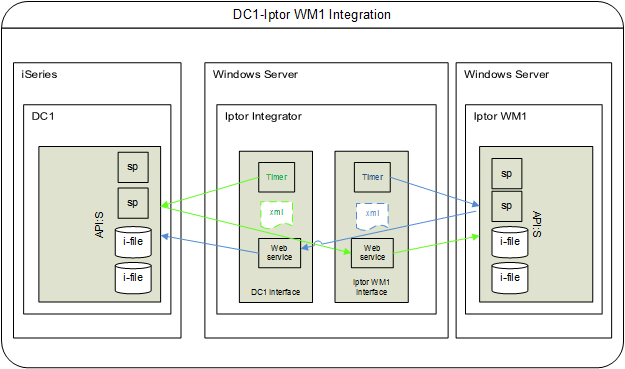
- Iptor Integrator uses timers to initiate transfers.
- Iptor Integrator sends XML to web services.
- Iptor Integrator holds connections to DC1 where the complex environment is set up.
- Iptor Integrator also holds connections to Iptor WM1 database.
- Iptor Integrator uses API:s in Public layer.
| Information |
Direction of exchange |
| Basic data (Items and Business partners) |
Sent to the external WMS system |
| Sales order information to be used for Dispatch planning and picking |
Sent to the external WMS system |
| Pick list information |
Received from the external WMS system |
| Packing information |
Received from the external WMS system |
| Purchase order information to be used for Reception planning and reception |
Sent to the external WMS system |
| Reception information |
Received from the external WMS system |
| Inventory adjustment |
Received from the external WMS system |
| Stock synchronization (a check against the “other” system ensuring you have the same on hand quantity in both systems) |
Received from the external WMS system |
What this document contains
Installation and configuration
| Installation and pre-load applications |
| File/Routine |
To do |
| Work with user profiles |
Create the following user profile with the same password. No special authority for the connection to/from Iptor Integrator.
| User profile and password |
| DC1xDYN (where x is the number of the release) |
|
| Work with companies |
For each company that will run the Iptor WM1 WMS interface, activate the WMS (DC1 WMS interface) application. |
| Function control file |
Activate the following function controls:
WMS-SYST
(WMS System) |
Activate this function. Character 1 (for Iptor WM1) will be set as the default. |
WMS-LOG
(Keep completed interface files) |
Activate this function if you want to keep completed interface file transactions that are not in error in the WMS log file. Any transactions in error will always be saved in the interface files regardless of this setting. |
WMSPACKR
(Package reporting in WMS) |
With this function activated, package reporting is handled in the external WMS system and information about the packaging is sent from the external WMS system. When running Iptor WM1, this function should not be activated. |
AUTO-LSL
(Auto lost sales, picking) |
If not already active, activate this function when running the WMS application to automatically trigger a lost sale during pick list confirmation from the external WMS if the full quantity on the order line was not pick confirmed. During the activation of this function you must also enter a value in the Character value field. This value must then be registered in the Lost sale reason table. |
BRKPICLI
(Break pick list per line) |
With this function activated, pick list numbers are to break per order line and orders can be grouped into waves in the external WMS with no connection to the pick list number in DC1. Without this function activated, normal break pick list is used. When running Iptor WM1, this function should be activated. |
PORECEPT
(Reception at close) |
With this function activated, the purchase order reception confirmation will be done when the transaction for *LINECLOSE is received from the WMS system. Without this function activated, reception confirmation will be directly when the transaction is received (streaming) from the WMS system. |
SNDPOADR
(Send PO addresses) |
With this function activated, all PO addresses (Order, Dispatch and Delivery) will be transferred to the external WMS regardless of whether or not it is an order specific address (999). When running Iptor WM1, this function should not be activated and only order specific Dispatch address is transferred. |
SNDPOCLO
(Send PO status close) |
With this function activated, PO line and PO header close (status is set to 60), will be transferred to the external WMS. An interface transaction will be created with the WMS interface action set to *CLOSE. When running Iptor WM1, this function should be activated. |
SNDPOHEX
(Send PO hdr even if already exists) |
- If this function is not activated, and if purchase order lines for a purchase order are split on different shipments, the header and the address information for the purchase order at status 30 is transferred once to the external WMS, while the detail information is transferred with each transfer.
- With this function activated, and if purchase order lines for a purchase order are split on different shipments, the header, address, and detail information for the purchase order at status 30 will be transferred to the external WMS with each transfer.
|
SNDSOADR
(Send SO addresses) |
With this function activated, all SO addresses will be transferred to the external WMS independent regardless of whether or not is an order specific address (999). When running Iptor WM1, this function should not be activated and only order specific Delivery address is transferred. |
SNDSOCLO
(Send SO status close) |
With this function activated, SO line and SO header close (status is set to 60), will be transferred to the external WMS. An interface transaction will be created with the WMS interface action set to *CLOSE. When running Iptor WM1, this function should be activated. |
SPLMSGWH
(Split message per warehouse) |
With this function activated, a separate message will be sent per WMS warehouse in DC1 when sending orders to the external WMS. Item data will be sent to all external WMS warehouses where the item is active and Business partner data will be sent to all external WMS warehouses. With multi Iptor WM1 environments, i.e. one per WMS warehouse in DC1, this function should be activated. |
|
| Update pre-loaded application tables |
Run pre-load tables. This will pre-load the following:
- Iptor WM1-related transaction types and their corresponding segments. See Transaction types below. The transaction types are activated during the pre-load and are used for logging sent/received transactions in the Work with WMS transactions.
- WMS related DI Documents connected to the pre-loaded transaction types. The WMS DI Documents are only used for documentation, describing the interface files and their layout.
- Database triggers: Files/programs belonging to the WMS application along with the Active flag set to YES.
- Data queue routines: Routine ID’s belonging to the WMS application.
- Defaults and replacement: Group WMS-DYN (Level INVSTAT) along with the keys 1-3 and 6-7 which correspond to the DC1 quantity types.
- Authority group WMS (WMS warehouse) along with new routines are possible to secure on warehouse level.
- WWPIC – Work with picking
- WWPAC – Package reporting
- WWREC – Work with receptions
- WWINV – Work with inventory
- WWSTS – Work with stock synchronization
Transaction types
Click the links below to view the Iptor WM1-related transaction types and their corresponding segments for sent and received transactions.
Sent transactions
| Business partner (Transaction type BP, DI Doc WMSBP) |
| DC1 |
| Segment |
Description |
| BPA |
Business partner address |
| BPR |
Business partner |
| Item (Transaction type IT, DI Doc WMSITEM) |
| IBS Enterprise |
| Segment |
Description |
| IAT |
Item attribute values (not used with Iptor WM1) |
| IBP |
Item business partner |
| ILA |
Item language |
| ITE |
Item |
| ITX |
Item text |
| IUN |
Item unit |
| Inbound order (i.e. Purchase order) (Transaction type IO, DI Doc WMSPO) |
| DC1 |
| Segment |
Description |
| IOAA |
Address attributes (only used when the SNDPOADR function is active) |
| IOAD |
Address (only used when the SNDPOADR function is active) |
| IOD |
Detail |
| IOH |
Header |
| IOT |
Text |
| Outbound order (i.e. Sales order) (Transaction type OO, DI Doc WMSSO) |
| DC1 |
| Segment |
Description |
| OOAA |
Address attributes (only used when the SNDSOADR function is active) |
| OOAD |
Address (only used when the SNDSOADR function is active) |
| OOD |
Detail |
| OOH |
Header |
| OOT |
Text |
Received transactions
| Iptor WM1 codes (Transaction type CD, DI Doc WMSCODIN) |
| DC1 |
| Segment |
Description |
| CED |
Iptor WM1 code values |
| Inventory adjustment (Transaction type IA, DI Doc WMSINV) |
| DC1 |
| Segment |
Description |
| IAD |
Inventory adjustment |
| Inbound result (i.e. purchase order result) (Transaction type IR, DI Doc WMSREC) |
| DC1 |
| Segment |
Description |
| *LINECLOSE |
Line close |
| *LINESTART |
Line start |
| *STREAMING |
Line receive (streaming) |
| Outbound result (i.e. Sales order result) (Transaction type OR, DI Doc WMSPIC) |
| DC1 |
| Segment |
Description |
| *LINECLOSE |
Line close |
| *LINEPICK |
Line pick |
| Outbound result (i.e. Package reporting) (Transaction type PA, DI Doc WMSPAC) |
| DC1 |
| Segment |
Description |
| *PACKCONF |
Package confirmation |
| *PACKHEAD |
Package header |
| *PACKLINE |
Package line |
| Stock synchronization (Transaction type SS, DI Doc WMSSYN) |
| DC1 |
| Segment |
Description |
| SSA |
Stock synchronization |
Detailed information about the transactions and mapping to/from Iptor WM1 can be found in the following Data Mapping Documents:
|
Create triggers |
| File/Routine |
To do |
| Not applicable |
Use command WRKDBTRG to access the Work with database triggers routine where you create triggers for active File/WMS-programs belonging to the WMS application. Running the Create triggers option will “start” the actual trigger program for the file(s), i.e. the program that will be called when an insert, update or delete operation occurs for the file(s). This program will do a first level filtering and then initiate the applicable transaction (to the data queue routine). A transaction program will then run in the data queue routine to populate data for the files being inserted, changed, deleted in the actual interface files.
Note: File SROIATV, program WMSR411 is not used with Iptor WM1 and trigger for this file/program should not be created.
Note: If the WMS initial load will be used for BP and Items, the Create triggers option can instead be executed directly after the initial load has been run. See Setting up basic data below. |
Start the data queue routines |
| File/Routine |
To do |
| Work with data queue routines |
Start the data queue routines for application WMS. |
Setting up system data
| Tables/Files |
To do |
| Work with DC1 user profiles |
Add the user profile DC1xDYN, (where x is the number of the release), if the user profile SYSTEM does not exist in this file. (If user profile SYSTEM exists, it will be used for those users that do not have their own profile.) |
| Default and replacements table |
This table is pre-loaded with DC1 Distribution. The group associated with the WMS integration functionality is WMS-DYN (WMS-Iptor WM1). At pre-load, this group is activated with the following level:
- INVSTAT = Inventory status
The Quantity types/Inventory status cross-reference must be set up. You need to create inventory status in Iptor WM1 and map these to the pre-loaded keys/quantity types that exist in DC1. The Character value must be entered on Key level. Do as follows:
- For the INVSTAT level, select the Keys option.
- On the Level keys panel, select the Change option for each of the keys (i.e. Quantity types) and change the Character value to the corresponding inventory status that exists in Iptor WM1 (i.e. that listed in the Status column below for the key).
Example:
| Key (i.e. Qtyp) |
Inventory status |
Description |
Blocked |
Conform |
| 1 |
UNU |
Unusable |
Y |
Y |
| 2 |
UNS |
Unsellable |
Y |
Y |
| 3 |
UNA |
Unavailable |
Y |
Y |
| 6 |
USA |
NCC Usable |
N |
N |
| 7 |
NCC |
NCC Unusable |
Y |
N |
|
| Work with warehouses |
Ideally you should have a designated warehouse used solely for WMS purposes. Note: A WMS warehouse is not allowed in combination with a WHM warehouse. For the applicable warehouse, select the WMS option and complete the following fields on the Iptor WM1 warehouse management system panel:
- Iptor WM1 active
- Set this field to YES if this warehouse should be activated for communication from/to the Iptor WM1 warehouse management system.
- WMS message receiver
- Enter the WMS message receiver of the external system. This will be used as the WSID for routing data to the web service endpoint and to retrieve the data base connection in Iptor WM1.
- External owner code
- If the external owner identity in the external warehouse management system is not the same as the company code, enter the external owner code.
- External warehouse id
- This field is currently not supported.
- SO transfer status
- This field controls when to send sales orders from DC1 to Iptor WM1. Enter the status (i.e. stage) when sales orders with a WMS warehouse are to be transferred to the external warehouse management system.
Permitted values:
| 20 |
Sales order printed |
| 30 |
Pick list printed |
- PO transfer status
- This field controls when to send purchase orders from DC1 to Iptor WM1. Enter the status (i.e. stage) when purchase orders with a WMS warehouse are to be transferred to the external warehouse management system.
Permitted values:
| 20 |
Purchase order printed |
| 25 |
Purchase order confirmed |
| 30 |
Reception note printed |
- Transfer rec number
- If the purchase order with a WMS warehouse is to be transferred to the external warehouse management system at status 30 (Reception note printed), set this field to YES or or NO denoting if the reception note number should be passed or not.
- Inv transaction type
- Enter the default inventory transaction type to be used for stock adjustment transactions when information is sent from the external warehouse management system to DC1.
- Reason code
- Enter the default reason code to be used for item non-conformity transactions.
- Dimension unit
- Enter the default dimension unit to be used when creating items in the external warehouse management system.
- Print text on doc 1-9
- In the nine fields at your disposal enter the Document ID that corresponds to the document 1-9 set-up in Iptor WM1.
|
| Work with authority groups |
Authority group WMS (WMS warehouse) is required for the applicable users to run the following routines for correcting errors for a WMS warehouse. Since all reporting related to picking, reception and inventory for a WMS warehouse is done in the external WMS system, no such transactions are allowed in DC1 (except when doing error corrections; and then only by authorized users):
- WWINV (Work with inventory)
- WWPIC (Work with picking)
- WWPAC (Package reporting)
- WWREC (Work with receptions)
- WWSTS (Work with stock synchronization)
|
| Work with event types |
Activate and set up the following event types if you want an alert to be created when a WMS transaction ends in error.
| Event type |
Description |
Trigger |
| WMSRECHPO |
WMS reception on held purch order |
A warning is displayed when a purchase order is held in DC1 and if this order is already transferred to the external Warehouse Management System (e.g., Iptor WM1). This event type is also created. An alert will be created for the reception from the external WMS system on the held order. |
| WMSTRNERR1 |
WMS PO reception in error |
The event is created when a purchase order reception, received from the external WMS system, ends in error. |
| WMSTRNERR2 |
WMS SO picking in error |
The event is created when a sales order picking, received from the external WMS system, ends in error. |
| WMSTRNERR3 |
WMS IN transaction in error |
The event is created when a WMS inventory transaction, received from the external WMS system, ends in error. |
| WMSTRNERR4 |
WMS receive trans in error |
The event is created when WMS-transactions, (other than those caught in WMSTRNERR1-3), received from the external WMS system, ends in error. |
| WMSTRNERR5 |
WMS send transaction in error |
The event is created when an inventory transaction, to be sent to the external WMS system, ends in error. |
|
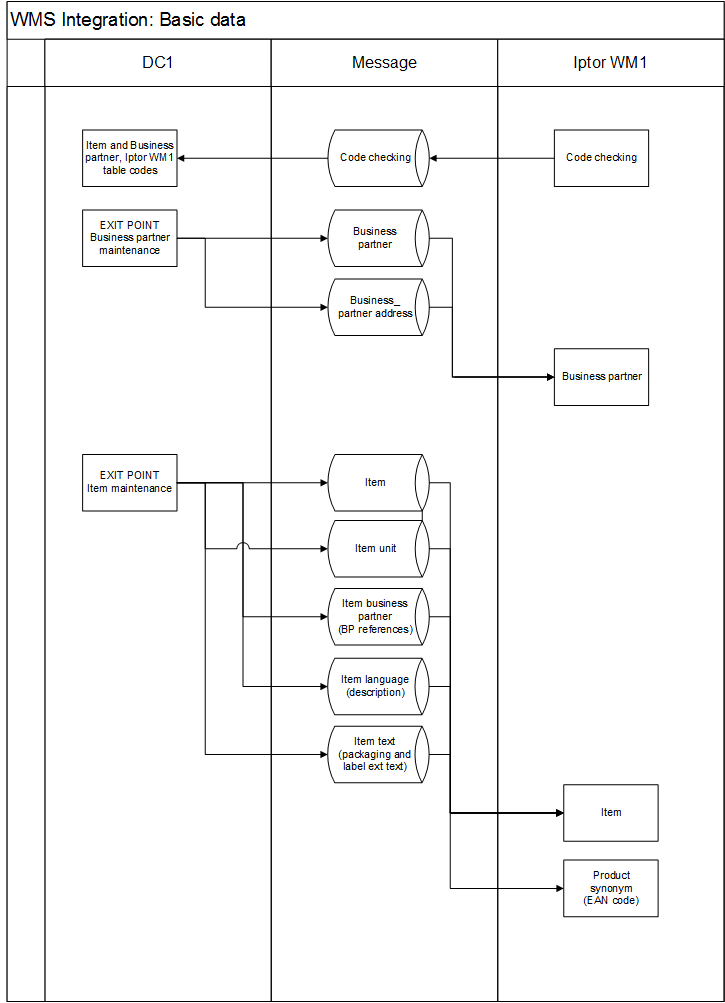
Setting up basic data
Item and Business partner (customer/supplier) data is used in all transactions that can be exchanged with the external Warehouse Management System (e.g., Iptor WM1). DC1 “owns” the item and business partner data, hence it can only be maintained in DC1. Specific Iptor WM1 information needs to be validated in these DC1 files. In order to be able to do this, information (which holds the unique table information) must first be sent from Iptor WM1 to DC1 via a file (i.e. Iptor WM1 code checking) in Iptor WM1.
Note: The following DC1 tables need to be manually set up and maintained in Iptor WM1:
- Language
- Country
- Currency
- Manner of transport
- Terms of delivery
- Terms of payment
- Unit
For every item and business partner already registered (or you plan on registering) in the DC1 system you must complete (i.e. validate) the Iptor WM1 related fields on the Iptor WM1 information panel. (Standard item and business partner template handling is available as is the standard window-prompt functionality in each relevant field).
The Item and Business partner information must then be sent back to Iptor WM1. How this takes place is dependent on the triggers activated. You have the following options:
- Send automatically (one at a time) as soon as you have entered the data for each item and business partner if the relevant file/trigger program is activated and “created” in Work with database triggers.
- If you want more control over when to initially send the data you can perform a WMS initial load after you have entered/validated the data. This will send all data simultaneously. Note: Make sure the relevant trigger flag is not set to YES. When ready, create the relevant triggers (i.e. select the Create trigger option) so that any change that may take place later on for the segment will be sent and updated in Iptor WM1.
| Tables/Files |
To do |
| Work with items |
On the Iptor WM1 information panel complete the following mandatory information for the item, i.e. click the window prompt icon and select that applicable.
- Prod loc group code
- The product location group code is validated against the Product location group table from Iptor WM1. The product location group specifies several aspects about the way an item is handled, such as the put away algorithm, the picking algorithm and the replenishment algorithm. The product location group of an item is taken as a default when creating a stock product. By linking product location groups to location groups, you define where products may be stored.
- Production ctrl type
- The product control type code is validated against the Product control type table from Iptor WM1. This table defines the use of the keys for stock products and the use of expiry dates.
- Container size
- The container size code is validated against the Container size table from Iptor WM1. The container size for the item is used at reception. The default value is taken from the Owner default table in Iptor WM1.
- Container type
- The container type code is validated against the Container type table from Iptor WM1. The container type for the item is used at reception time. The default value is taken from the Owner default table in Iptor WM1.
- Package type code
- The package type code is used when creating outbound order lines. The value you enter in this field is validated against the Package type table from Iptor WM1. The default value is taken from the Owner default table.
See the panel help for a description of the optional fields.
|
| Work with business partners |
On the Iptor WM1 information panel complete the following information:
- Relation group
- Enter the relation group denoting the logical grouping of customer/suppliers. It has no specific fixed functionality in WMS, but it can be used in all kind of rules to divide orders for those business partners, e.g., in picklist and/or waves.
- Logistic group
- Enter the logistic group. This logistic group on business partner level is a default which can be overridden on order detail lines. To a logistic group, several VAL actions can be linked in the WMS system. To be executed during logistic processes.
|
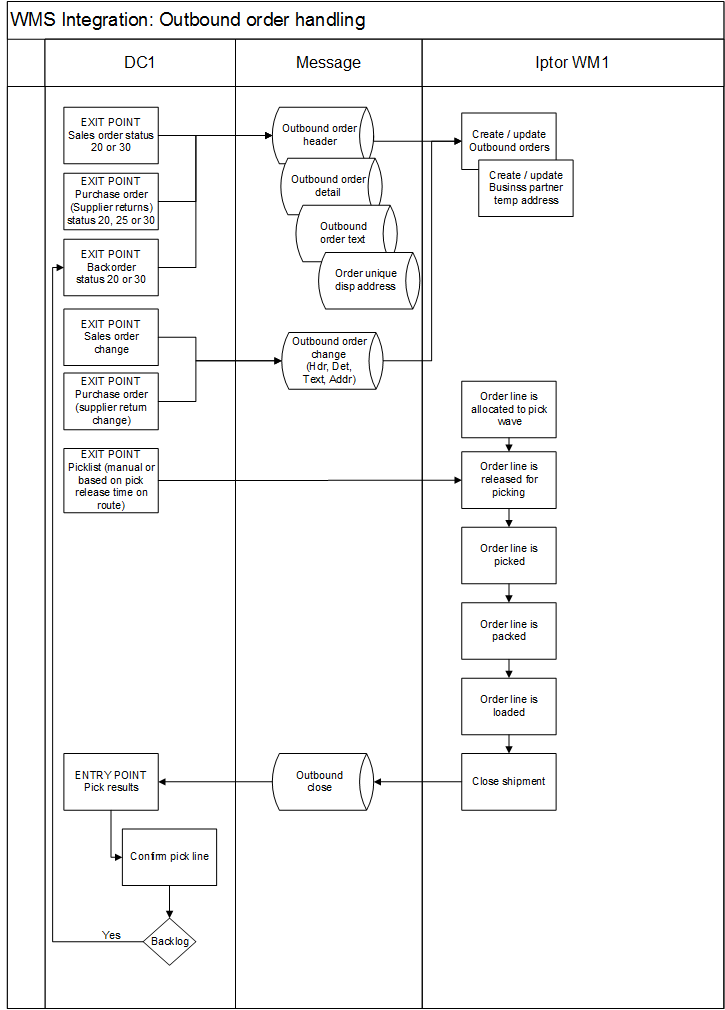
Message flow
Click each link to view an illustration of the message flow between the systems.
Overview of messages
Basic data
Inbound orders (Reception handling)
Outbound orders (Dispatch handling)
Inventory adjustments and checks
Related topics