- Select the Work with reports menu item.
- On the main panel, click Add.
- You access Work with reports, Description. The following fields are mandatory:
- Report
- Enter the name of the report you are creating.
- Description
- Enter a description of the report.
- Report type
- Enter the type of report you are creating, i.e. 1, which represents a version report. Version reports are largely predefined in layout, based on the structure of your key fields. This kind of report is mainly used when the files are logically structured. Whereas, type 2 reports are line reports which consist of lines that you set up and define yourself, regardless of the structure of your files.
- Lines per page
- First line
- Last line
- Lines per inch
- Characters per inch
- Left margin
- Number of copies
- Form
- Print all breaks
- Set to NO. For more information about this field, see Define a description with “Print all breaks” YES/NO.
- Default version
- Percentage limit 1, 2 and 3
- These fields work in conjunction with the Percentage marking 1, 2, 3 fields. The purpose is to quickly find values on a report that deviate from the limits you specify in these fields.
- By entering a marking (any character) in the corresponding fields for Percentage marking, the system will print this marking for each value on the report that deviates from the percentage limit defined in these fields. For more information, see sub-section Report printout.
- Percentage marking 1, 2 and 3
- See description of the Percentage limit 1, 2 and 3 fields.
- Reverse sign
- Tip: This field is mainly used when creating reports in DC1 Financials.
- Print quality
- Drawer
- Font
- Rotation
- Suppress line
- Indicate if the report should suppress lines where all columns are zero.
- You access Work with reports, Select key numbers where you select which key(s) to use in the report. The keys will then be used for validating balance types on the columns, selecting key values on columns, lines or versions and sequence on the version. Tip: You should only define the keys that you will use for this report according to the above rule. If you are not sure which key(s) are used to get a specific balance type, then you can retrieve that information by making an enquiry on System statistic keys. Select Selected key 1.
- You access Selectable keys. All keys, defined in Work with system statistics keys, are listed. If any keys have been defined in Work with custom statistic keys, then they will be listed as well. Select the applicable key.
- You return to the Select key number panel. The key you selected is now defined for Selection key 1.
- Repeat steps 4-6 until all applicable keys are selected. Tip: You can mark all keys that you want to define and then click OK.
For a detailed description of all the fields on this panel, see the Panel help. Click OK.
Click OK to update. The report description is now defined and you can maintain the report. See the sub-section Report printout below for a sample of what the report description looks like on a printed report.
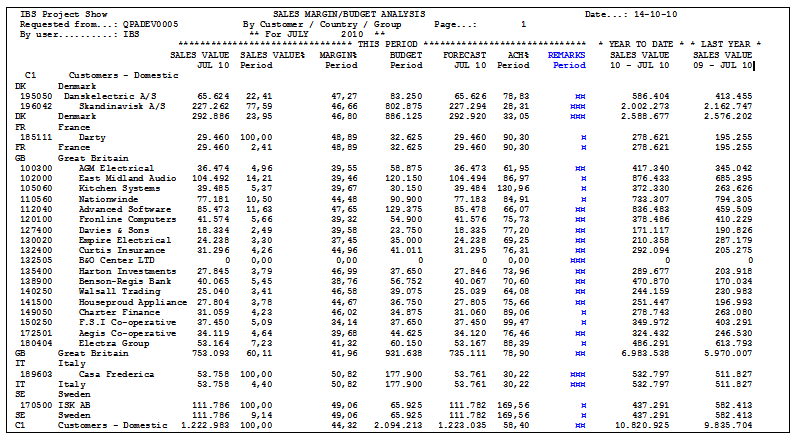
Report printout

The blue information on the above printout is information defined in the report description.
On this report sample, the values below the REMARKS column heading are the characters you entered in the Percentage marking 1, 2 and 3 fields in step 3. In the corresponding Percentage limit 1, 2 and 3 fields, the limits for the percentage markings were entered.
As you can see on the printout, Percentage marking 3 (¤¤¤) is printed for customer 189603 (Casa Frederica). This is because the sales value for this customer is only 30,22 % of the budgeted value (as shown below column ACH%), and 30,22 % is below Percentage limit 2 (50 %).
For more information about creating column REMARKS, see Define a budget column. Exit the routine.