Four scenarios apply when it comes to creating a version with break levels:
- Print all breaks in the report description is set to YES and Detail in the version is set to YES. See section Report printout for an example.
- Print all breaks in the report description is set to YES and Detail in the version is NO. See section Report printout for an example.
- Print all breaks in the report description is NO and Detail in the version is set to YES. See section Report printout for an example.
- Print all breaks in the report description is NO and Detail in the version is NO. See section Report printout for an example.
Prerequisites
- Make sure that Print all breaks is set to YES in the report description for the report with which you want to connect this version. See step 3 in Define description for a version report. See also Define a description with “Print all breaks” YES/NO for further information about the field.
- The Break level text table should contain the following break level texts for item category 1:
Break key Text C Consumables & Accessories D Domestic Appliances O Office Equipment
To create a version according to scenario 1 above, do as follows:
- Select the Work with reports menu item.
- On the main panel, select the applicable version report and click Versions.
- You access Work with report versions, Versions by report. Click Add.
- You access the detail panel. Complete the following fields:
- Version
- Enter the name of the version.
- Description
- Enter a description of the version.
- Sequence
- Enter 1 for key Item category 1, which means that the information will be sorted according to Item category 1.
- Level
- Enter 1 for Item category 1.
- Detail
- Enter YES for Item category 1.
- On the Work with report versions, Select key values panel, do NOT define any selections. Click OK twice to create the version. Exit the routine.
Complete the other fields on this panel as described in step 4 in Define a simple version.
Click Selection.
Report printout
Scenario 1:
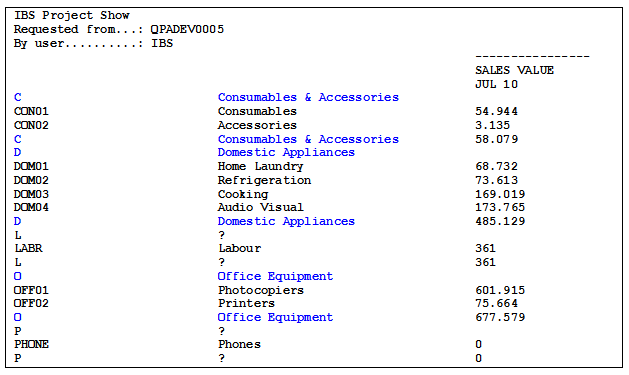
Below is an extract of the selected version report, connected to the version created here, i.e. according to scenario 1.

Level 1 was selected, i.e., a sum will be printed for the first letter (level) in the Item category 1 code (for example P for Item category PHONE).
A question mark is shown for all levels that are not defined in the Break level text table. In this example the only break levels that are defined in the Break level text table for Item category 1 are:
- C (Consumables & Accessories)
- D (Domestic Appliances)
- O (Office Equipment)
Since Detail was YES, the Item Category 1 codes are also printed, e.g., DOM01, DOM02, DOM03 and DOM04.
Scenario 2:
The difference from scenario 1 is that Detail is NO. This means that the Item category 1 codes are not printed.

Scenario 3:
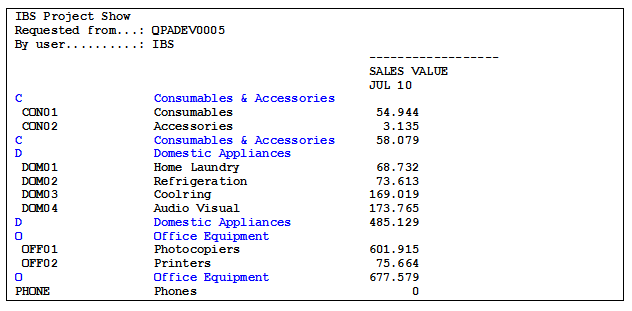
In this scenario Print all breaks in the Report description is NO and Detail in the Report version is set to YES.

Since Print all breaks in the Report description is NO, only the break level texts defined in the Break level text table will be printed. Since Detail was YES, the Item Category 1 codes are also printed, e.g., DOM01, DOM02, DOM03 and DOM04.
Note: The Item categories OFF and PHONES are printed, since Detail was YES.
Scenario 4:
In this scenario Print all breaks in the Report description is NO and Detail in the Report version is NO.
